
Cloudflare Turnstile
Updated August 8, 2026
Protect your forms from bots and abuse using Cloudflare Turnstile. Turnstile is a free, privacy-first CAPTCHA alternative: most visitors are verified in the background without ever solving a puzzle.
Why Turnstile?
Section titled “Why Turnstile?”- No puzzles: Most visitors pass with a single checkbox or no interaction at all
- Privacy-first: No tracking cookies, no data sold, GDPR-friendly by design
- Free: Unlimited widgets and verifications on Cloudflare’s free tier
- Fast: Lightweight script, verification usually completes in under a second
- Flexible modes: Managed, non-interactive, or fully invisible
How It Works
Section titled “How It Works”- User loads your form: the Turnstile widget loads on the page
- Turnstile verifies the visitor: usually invisibly, sometimes with a checkbox
- User submits the form: the token is sent via
cf-turnstile-response - Forminit verifies the token: Forminit calls Cloudflare’s siteverify API with your Secret Key
- Submission accepted or marked as spam: submissions with a missing or invalid token go to your form’s Spam folder
Important: Turnstile verification only runs after you add your Secret Key to Forminit (Form Settings → CAPTCHA → Cloudflare Turnstile). Without the Secret Key, Turnstile is not activated and tokens are not validated.
Prerequisites
Section titled “Prerequisites”- A Cloudflare account (free at cloudflare.com)
- A Forminit form
- Access to your website’s HTML/JavaScript
Step 1: Create a Turnstile Widget in Cloudflare
Section titled “Step 1: Create a Turnstile Widget in Cloudflare”- Log in to the Cloudflare dashboard and open Turnstile from the sidebar
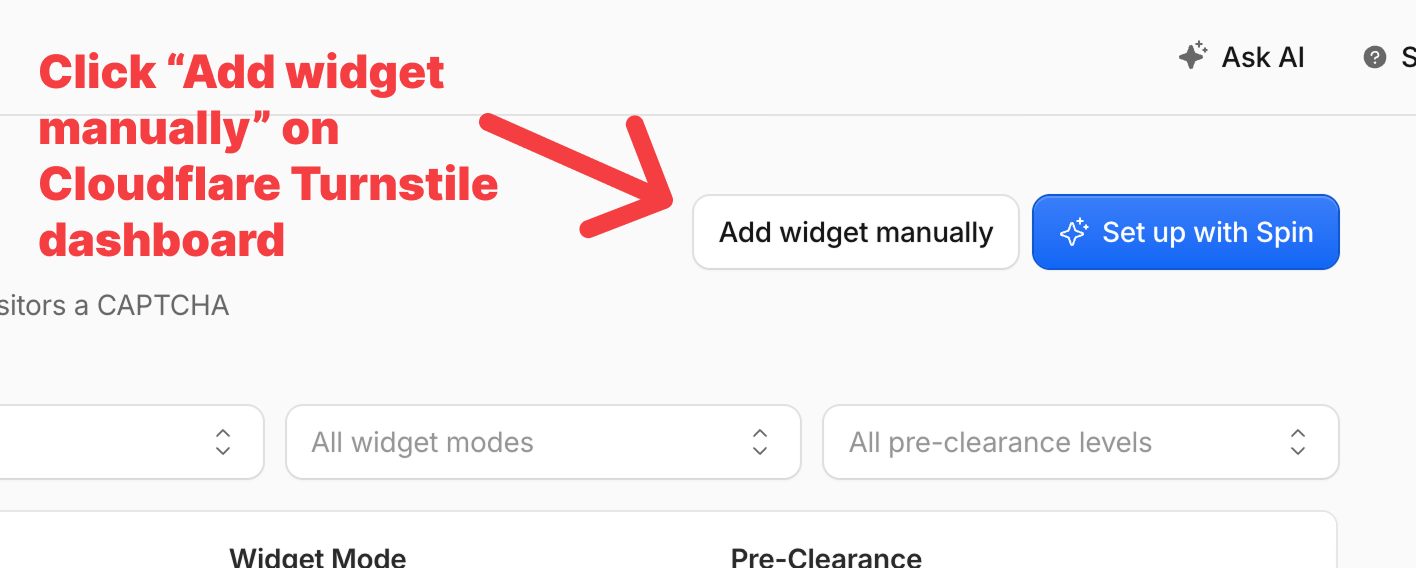
- Click Add widget manually
- Give the widget a name so you can identify it later (e.g.,
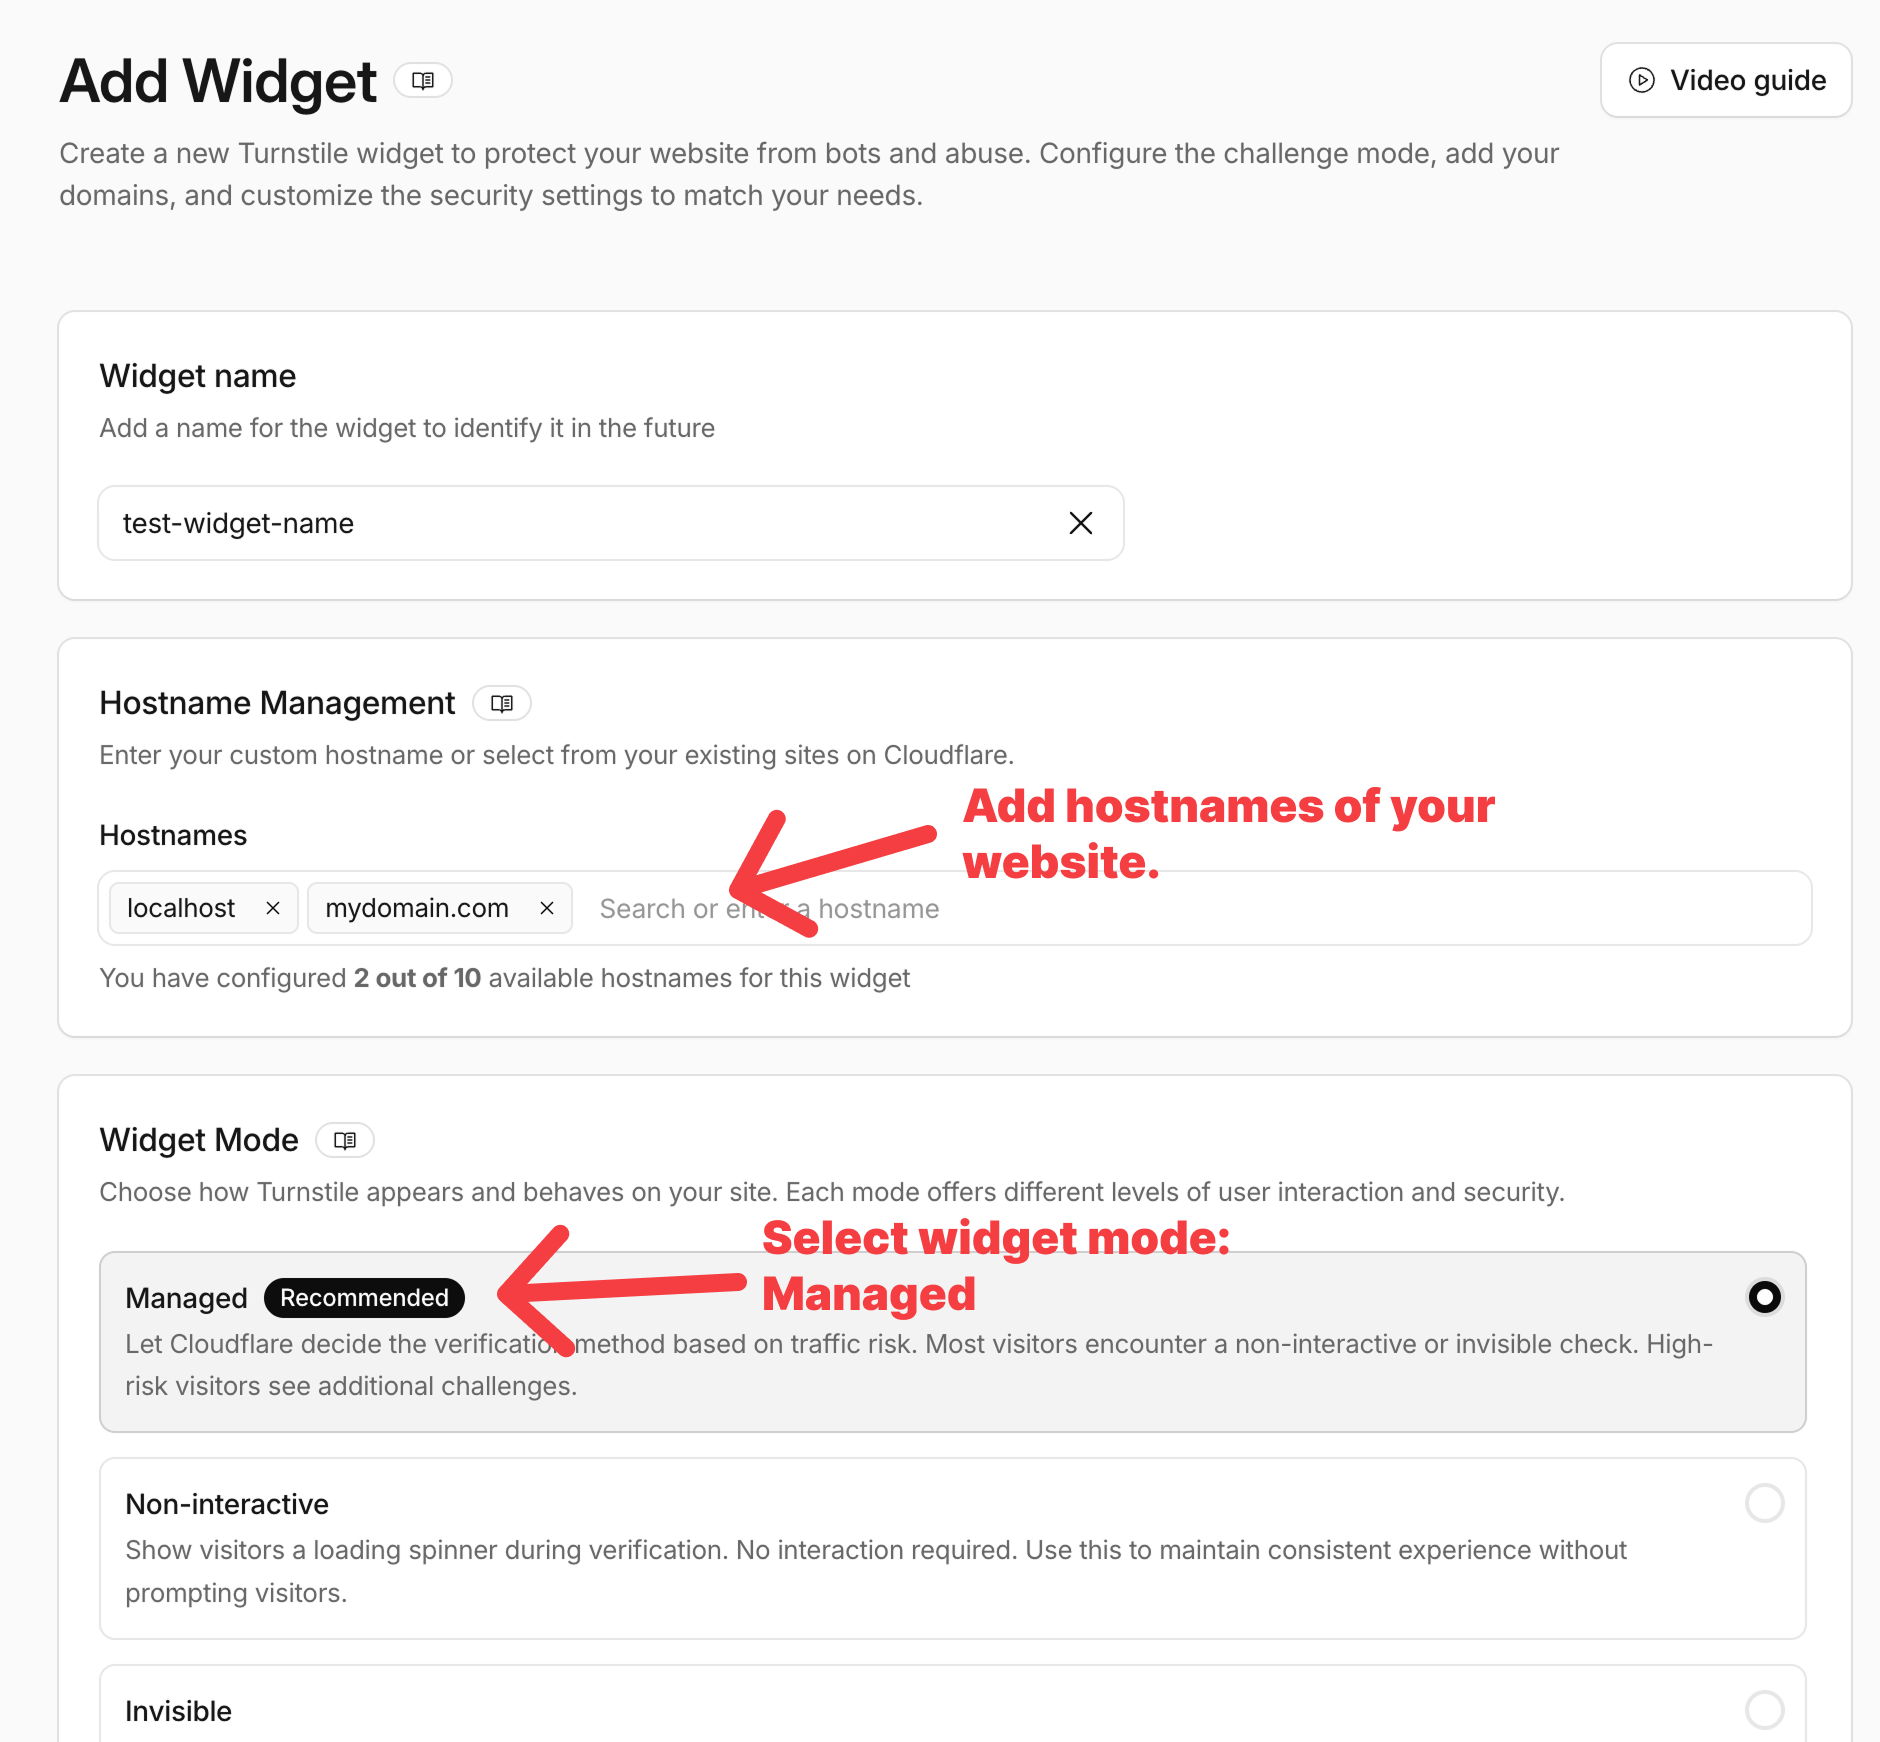
my-contact-form) - Under Hostname Management, add the hostnames of your website (e.g.,
mydomain.com). If you are testing locally, also addlocalhostor your local IP - Under Widget Mode, select Managed (recommended). Cloudflare decides the verification method per visitor: most people see a non-interactive or invisible check, high-risk visitors get an extra challenge
- Click Create
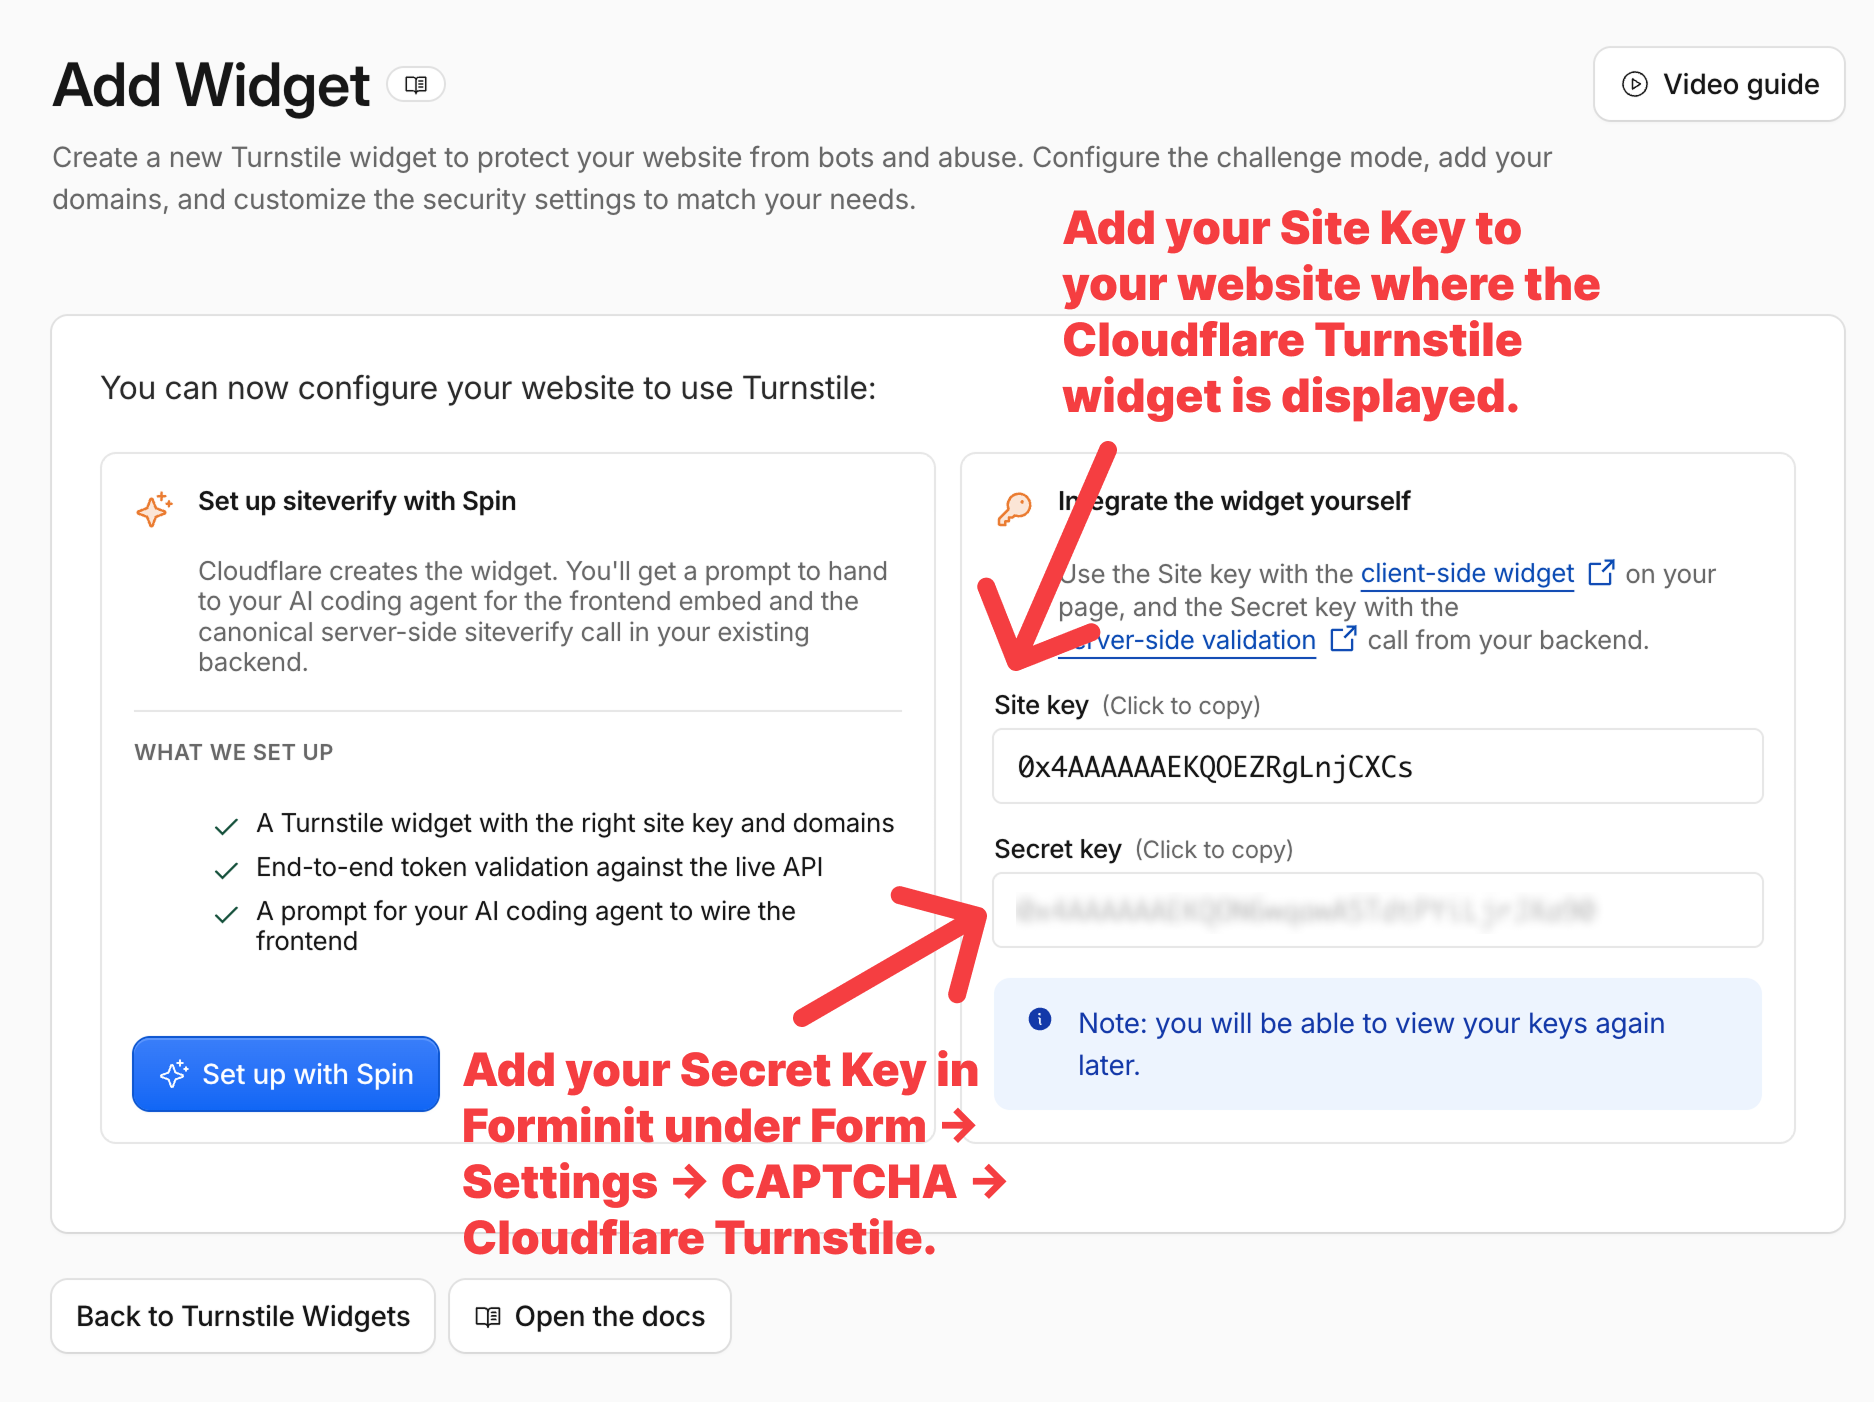
- Cloudflare shows two keys. You need both:
- Site Key: goes in your website’s code, next to the Turnstile widget
- Secret Key: goes into Forminit (next step). Keep it confidential, never expose it in client-side code
Step 2: Add the Secret Key to Forminit
Section titled “Step 2: Add the Secret Key to Forminit”- Go to your Forminit Dashboard
- Select your form
- Navigate to Form Settings → CAPTCHA
- Select Cloudflare Turnstile as the provider
- Paste your Secret Key in the designated field
- Click Save
Once saved, Forminit automatically verifies the cf-turnstile-response token with Cloudflare on every submission.
Don’t skip this step. If the Secret Key is not added, Turnstile is not activated on your form and no validation happens, even if the widget is on your page.
Step 3: Add Turnstile to Your Frontend
Section titled “Step 3: Add Turnstile to Your Frontend”Load the Turnstile Script
Section titled “Load the Turnstile Script”Add the Turnstile script to your HTML:
<script src="https://challenges.cloudflare.com/turnstile/v0/api.js" async defer></script>Place this in the <head> or before your closing </body> tag.
Add the Widget
Section titled “Add the Widget”Place the widget element inside your form, using your Site Key:
<div class="cf-turnstile" data-sitekey="YOUR_SITE_KEY"></div>Field Naming
Section titled “Field Naming”The Turnstile token must be submitted with the field name cf-turnstile-response (no fi- prefix).
| Format | How to Include |
|---|---|
| FormData | formData.set('cf-turnstile-response', token) (use set, not append: the widget injects a hidden input with the same name) |
| JSON | Add as a text block: { type: 'text', name: 'cf-turnstile-response', value: token } |
| Plain HTML POST | Nothing to do: the widget injects a hidden cf-turnstile-response input automatically |
HTML / Static Website (with Forminit SDK)
Section titled “HTML / Static Website (with Forminit SDK)”The recommended setup for static sites. The submit button stays disabled until Turnstile issues a token.
<!DOCTYPE html>
<html>
<head>
  <title>Contact Form</title>
  <script src="https://challenges.cloudflare.com/turnstile/v0/api.js" async defer></script>
</head>
<body>
  <form id="contact-form">
    <input type="text" name="fi-sender-firstName" placeholder="First name" required />
    <input type="text" name="fi-sender-lastName" placeholder="Last name" required />
    <input type="email" name="fi-sender-email" placeholder="Email" required />
    <textarea name="fi-text-message" placeholder="Message" required></textarea>

    <!-- Turnstile widget -->
    <div
      class="cf-turnstile"
      data-sitekey="YOUR_SITE_KEY"
      data-callback="onTurnstileSuccess"
      data-expired-callback="onTurnstileExpired"
      data-error-callback="onTurnstileError"
    ></div>

    <button type="submit" id="submit-btn" disabled>Send</button>
  </form>

  <p id="form-result"></p>

  <script src="https://forminit.com/sdk/v1/forminit.js"></script>
  <script>
    const forminit = new Forminit();
    const FORM_ID = 'YOUR_FORM_ID';

    const form = document.getElementById('contact-form');
    const submitBtn = document.getElementById('submit-btn');
    let turnstileToken = null;

    // Turnstile callbacks (must be global)
    window.onTurnstileSuccess = function (token) {
      turnstileToken = token;
      submitBtn.disabled = false;
    };

    window.onTurnstileExpired = function () {
      turnstileToken = null;
      submitBtn.disabled = true;
    };

    window.onTurnstileError = function () {
      turnstileToken = null;
      submitBtn.disabled = true;
    };

    form.addEventListener('submit', async function (event) {
      event.preventDefault();

      if (!turnstileToken) {
        document.getElementById('form-result').textContent = 'Please complete the verification.';
        return;
      }

      // Prevent double submits: the token is single-use
      submitBtn.disabled = true;

      const formData = new FormData(form);
      // The widget already injects a hidden cf-turnstile-response input,
      // so use set() (not append) to avoid sending the field twice
      formData.set('cf-turnstile-response', turnstileToken);

      const { data, redirectUrl, error } = await forminit.submit(FORM_ID, formData);

      // The token is spent either way: reset the widget so the success
      // callback re-enables the button with a fresh token
      turnstile.reset();
      turnstileToken = null;

      if (error) {
        document.getElementById('form-result').textContent = error.message;
        return;
      }

      document.getElementById('form-result').textContent = 'Message sent successfully!';
      form.reset();
    });
  </script>
</body>
</html>
Plain HTML (No JavaScript)
Section titled “Plain HTML (No JavaScript)”If you use a classic <form action> POST (page reload), you don’t need any JavaScript. The Turnstile widget automatically injects a hidden cf-turnstile-response input into the form, and Forminit picks it up on submission.
<!DOCTYPE html>
<html>
<head>
  <title>Contact Form</title>
  <script src="https://challenges.cloudflare.com/turnstile/v0/api.js" async defer></script>
</head>
<body>
  <form action="https://forminit.com/f/YOUR_FORM_ID" method="POST" enctype="multipart/form-data">
    <input type="text" name="fi-sender-firstName" placeholder="First name" required />
    <input type="email" name="fi-sender-email" placeholder="Email" required />
    <textarea name="fi-text-message" placeholder="Message" required></textarea>

    <!-- Turnstile widget: injects cf-turnstile-response automatically -->
    <div class="cf-turnstile" data-sitekey="YOUR_SITE_KEY"></div>

    <button type="submit">Send</button>
  </form>
</body>
</html>Use the community-maintained @marsidev/react-turnstile component:
npm install forminit @marsidev/react-turnstileimport { useState, useRef, FormEvent } from 'react';
import { Forminit } from 'forminit';
import { Turnstile } from '@marsidev/react-turnstile';
import type { TurnstileInstance } from '@marsidev/react-turnstile';
const SITE_KEY = 'YOUR_SITE_KEY';
const FORM_ID = 'YOUR_FORM_ID';
const forminit = new Forminit();
export function ContactForm() {
const [status, setStatus] = useState<'idle' | 'loading' | 'success' | 'error'>('idle');
const [error, setError] = useState<string | null>(null);
const [token, setToken] = useState<string | null>(null);
const turnstileRef = useRef<TurnstileInstance>(null);
async function handleSubmit(e: FormEvent<HTMLFormElement>) {
e.preventDefault();
if (!token) {
setError('Please complete the verification.');
return;
}
setStatus('loading');
setError(null);
// Set the Turnstile token (no fi- prefix). set() rather than append():
// the Turnstile component injects a hidden input with the same name
const form = e.currentTarget;
const formData = new FormData(form);
formData.set('cf-turnstile-response', token);
const { data, redirectUrl, error } = await forminit.submit(FORM_ID, formData);
if (error) {
setStatus('error');
setError(error.message);
turnstileRef.current?.reset();
setToken(null);
return;
}
setStatus('success');
form.reset();
// Tokens are single-use: always reset after a submission
turnstileRef.current?.reset();
setToken(null);
}
return (
<form onSubmit={handleSubmit}>
<input type="text" name="fi-sender-firstName" placeholder="First name" required />
<input type="text" name="fi-sender-lastName" placeholder="Last name" required />
<input type="email" name="fi-sender-email" placeholder="Email" required />
<textarea name="fi-text-message" placeholder="Message" required />
<Turnstile
ref={turnstileRef}
siteKey={SITE_KEY}
onSuccess={(token) => setToken(token)}
onExpire={() => setToken(null)}
onError={() => setToken(null)}
options={{ theme: 'auto' }}
/>
{status === 'error' && <p className="error">{error}</p>}
{status === 'success' && <p className="success">Message sent!</p>}
<button type="submit" disabled={status === 'loading' || !token}>
{status === 'loading' ? 'Sending...' : 'Send'}
</button>
</form>
);
}Next.js
Section titled “Next.js”Same component as React, but route submissions through the built-in Forminit proxy so your API key stays server-side:
const forminit = new Forminit({ proxyUrl: '/api/forminit' });Everything else (the Turnstile component, token handling, reset logic) is identical to the React example above. See the Next.js integration guide for setting up createForminitProxy.
Nuxt.js
Section titled “Nuxt.js”Use the official @nuxtjs/turnstile module:
npx nuxi module add turnstile// nuxt.config.ts
export default defineNuxtConfig({
modules: ['@nuxtjs/turnstile'],
turnstile: {
siteKey: 'YOUR_SITE_KEY',
},
});<script setup lang="ts">
import { ref } from 'vue';
import { Forminit } from 'forminit';
const FORM_ID = 'YOUR_FORM_ID';
const forminit = new Forminit({ proxyUrl: '/api/forminit' });
const turnstileToken = ref('');
const turnstileRef = ref();
const formRef = ref<HTMLFormElement | null>(null);
const status = ref<'idle' | 'loading' | 'success' | 'error'>('idle');
const errorMessage = ref<string | null>(null);
async function handleSubmit() {
if (!formRef.value) return;
if (!turnstileToken.value) {
errorMessage.value = 'Please complete the verification.';
return;
}
status.value = 'loading';
errorMessage.value = null;
const formData = new FormData(formRef.value);
// NuxtTurnstile injects a hidden cf-turnstile-response input,
// but append manually as a safeguard
if (!formData.has('cf-turnstile-response')) {
formData.append('cf-turnstile-response', turnstileToken.value);
}
const { data, redirectUrl, error } = await forminit.submit(FORM_ID, formData);
if (error) {
status.value = 'error';
errorMessage.value = error.message;
turnstileRef.value?.reset();
return;
}
status.value = 'success';
formRef.value.reset();
// Tokens are single-use: always reset after a submission
turnstileRef.value?.reset();
}
</script>
<template>
<form ref="formRef" @submit.prevent="handleSubmit">
<input type="text" name="fi-sender-firstName" placeholder="First name" required />
<input type="email" name="fi-sender-email" placeholder="Email" required />
<textarea name="fi-text-message" placeholder="Message" required />
<NuxtTurnstile ref="turnstileRef" v-model="turnstileToken" />
<p v-if="status === 'error'" class="error">{{ errorMessage }}</p>
<p v-if="status === 'success'" class="success">Message sent!</p>
<button type="submit" :disabled="status === 'loading' || !turnstileToken">
{{ status === 'loading' ? 'Sending...' : 'Send' }}
</button>
</form>
</template>How Failed Verification Is Handled
Section titled “How Failed Verification Is Handled”Turnstile verification does not reject submissions with an error. Instead:
| Scenario | What Happens |
|---|---|
| Secret Key not added to Forminit | Turnstile is not active. No validation runs, all submissions are accepted normally |
| Secret Key added, valid token submitted | Submission accepted into your inbox |
| Secret Key added, token missing (widget not on page) | Submission is marked as spam and moved to the Spam folder |
| Secret Key added, token invalid or expired | Submission is marked as spam and moved to the Spam folder |
Common mistake: Adding the Secret Key in Forminit but forgetting the widget on your frontend. Every submission will then arrive without a
cf-turnstile-responsetoken and land in the Spam folder. If legitimate submissions suddenly stop appearing in your inbox, check the Spam folder first.
Monitoring Verification in Logs
Section titled “Monitoring Verification in Logs”Every submission has a detailed log entry showing what was sent and how Turnstile verification went:
- Go to your Forminit Dashboard
- Select your form
- Navigate to Form Settings → Logs
Use the logs to confirm that tokens are being received and validated after you finish the setup.
Testing
Section titled “Testing”Dummy Keys
Section titled “Dummy Keys”Cloudflare provides dummy keys for development. Dummy sitekeys work from any domain, including localhost.
Sitekeys (client side):
| Sitekey | Behavior | Visibility |
|---|---|---|
1x00000000000000000000AA | Always passes | Visible |
2x00000000000000000000AB | Always fails | Visible |
1x00000000000000000000BB | Always passes | Invisible |
2x00000000000000000000BB | Always fails | Invisible |
3x00000000000000000000FF | Forces an interactive challenge | Visible |
Secret keys (add to Forminit):
| Secret Key | Behavior |
|---|---|
1x0000000000000000000000000000000AA | Always passes |
2x0000000000000000000000000000000AA | Always fails |
3x0000000000000000000000000000000AA | Yields a “token already spent” error |
Note: Remember to switch to your real keys before deploying to production.
Local Development with Real Keys
Section titled “Local Development with Real Keys”Real sitekeys only work on hostnames you added in Step 1. To test with production keys locally, add localhost (or your local IP) to the widget’s hostnames in the Cloudflare dashboard.
Widget Configuration Reference
Section titled “Widget Configuration Reference”Widget Modes
Section titled “Widget Modes”Set in the Cloudflare dashboard when creating the widget:
| Mode | Behavior |
|---|---|
| Managed (recommended) | Cloudflare picks the verification method per visitor. Most see a non-interactive check, high-risk visitors get a checkbox |
| Non-interactive | Shows a loading bar while verification runs in the background. No interaction ever required |
| Invisible | Completely invisible, no widget shown at all |
Data Attributes
Section titled “Data Attributes”| Attribute | Values | Description |
|---|---|---|
data-sitekey | Your site key | Required |
data-callback | Function name | Called with the token on success |
data-expired-callback | Function name | Called when the token expires |
data-error-callback | Function name | Called on error |
data-theme | auto, light, dark | Color theme (default: auto) |
data-size | normal, flexible, compact | Widget size (default: normal, 300x65px) |
data-language | auto or ISO 639-1 code | Widget language (e.g., es, de, fr) |
data-action | String (max 32 chars) | Label to differentiate widgets in Cloudflare analytics |
Token Expiration
Section titled “Token Expiration”Turnstile tokens are single-use and expire after 300 seconds (5 minutes). Always call turnstile.reset() after every submission (success or error) so the next submission gets a fresh token. If a user takes longer than 5 minutes to submit, the data-expired-callback fires; by default the widget refreshes the token automatically.
Set Up with an AI Coding Agent
Section titled “Set Up with an AI Coding Agent”Building with Claude Code, Cursor, or another coding agent? Copy this prompt, replace the two placeholders, and paste it into your agent:
Add Cloudflare Turnstile spam protection to my existing Forminit form.

Context:
- My form submits to Forminit (form ID: YOUR_FORM_ID), either via the
  Forminit JS SDK (forminit.submit(formId, formData)) or a POST to
  https://forminit.com/f/YOUR_FORM_ID
- My Turnstile Site Key: YOUR_SITE_KEY
- The Secret Key is already configured in the Forminit dashboard
  (Form Settings -> CAPTCHA -> Cloudflare Turnstile), so the server-side
  verification is handled by Forminit. Do NOT write any siteverify code.

Requirements:
1. Load the Turnstile script:
   <script src="https://challenges.cloudflare.com/turnstile/v0/api.js" async defer></script>
2. Render the widget inside the form:
   <div class="cf-turnstile" data-sitekey="YOUR_SITE_KEY"></div>
   (In React use @marsidev/react-turnstile, in Nuxt use @nuxtjs/turnstile.)
3. Capture the token from the widget's success callback and keep the submit
   button disabled until a token exists.
4. On submit, include the token with the EXACT field name
   cf-turnstile-response (no fi- prefix). For FormData use set, not append,
   because the widget injects a hidden input with the same name:
   formData.set('cf-turnstile-response', token)
5. Tokens are single-use and expire after 5 minutes: after every submission
   attempt (success or error), reset the widget (turnstile.reset()) and clear
   the stored token. Also clear the token in the expired/error callbacks.
6. Do not change any existing fi-* field names or other form logic.

For local testing you may temporarily use Cloudflare's dummy sitekey
1x00000000000000000000AA (always passes, works on localhost), but leave
YOUR_SITE_KEY in the final code.
Summary
Section titled “Summary”| Step | Action |
|---|---|
| 1 | Create a Turnstile widget in the Cloudflare dashboard (Add widget manually → name → hostnames → Managed mode) |
| 2 | Add the Secret Key to Forminit: Form Settings → CAPTCHA → Cloudflare Turnstile |
| 3 | Load the Turnstile script and add the widget with your Site Key |
| 4 | Include the token as cf-turnstile-response in your submission |
| 5 | Reset the widget after every submission (tokens are single-use) |
| 6 | Verify everything works in Form Settings → Logs, and check the Spam folder for rejected submissions |
Is Cloudflare Turnstile free?
Section titled “Is Cloudflare Turnstile free?”Yes. Turnstile is free, including unlimited widgets and verifications. You only need a free Cloudflare account to create a widget and get your Site Key and Secret Key. Your website does not need to be hosted on or proxied through Cloudflare.
Is Cloudflare Turnstile GDPR compliant?
Section titled “Is Cloudflare Turnstile GDPR compliant?”Turnstile is designed to be privacy-preserving and GDPR-friendly, but no CAPTCHA makes a site compliant on its own. Per Cloudflare’s Turnstile Privacy Addendum, the widget collects limited signals (client IP address, TLS fingerprint, User-Agent header, and the sitekey), uses them strictly for bot detection, and Cloudflare states it cannot directly identify individuals from these signals. The data is not used for advertising.
As the site operator, mention Turnstile in your privacy policy; Cloudflare’s standard Data Processing Addendum with Standard Contractual Clauses covers processing and international transfers. Cloudflare acts as a data processor when protecting your forms (you are the controller), and as a controller only for improving Turnstile’s own bot detection.
Does Cloudflare Turnstile require a cookie consent banner?
Section titled “Does Cloudflare Turnstile require a cookie consent banner?”Generally no. Cloudflare states that Turnstile does not use cookies to collect or store information, and bot protection is typically processed under legitimate interest (GDPR Article 6(1)(f)) as a strictly necessary security function, so most sites run Turnstile without a consent prompt. You should still disclose it in your privacy policy, and confirm the assessment for your jurisdiction with your own counsel.
What is the difference between Turnstile and reCAPTCHA?
Section titled “What is the difference between Turnstile and reCAPTCHA?”Turnstile verifies most visitors without puzzles and does not feed data into an advertising ecosystem, while reCAPTCHA is operated by Google and raises more privacy and consent questions, especially in the EU. Both are free and both are supported by Forminit, so switching is a matter of swapping the widget on your page and the Secret Key in Form Settings, CAPTCHA.
Do I need to host my website on Cloudflare to use Turnstile?
Section titled “Do I need to host my website on Cloudflare to use Turnstile?”No. Turnstile works on any website regardless of hosting, DNS, or CDN provider. You only need a free Cloudflare account to create the widget and copy your keys.
Why do my form submissions go to spam after enabling Turnstile?
Section titled “Why do my form submissions go to spam after enabling Turnstile?”This happens when Forminit has your Secret Key but submissions arrive without a valid cf-turnstile-response token: usually the widget is missing from the page, the wrong Site Key is used, or the token is not included in the request. Check Form Settings → Logs to see exactly what each submission sent, and make sure the token field is named exactly cf-turnstile-response.
Can I test Cloudflare Turnstile on localhost?
Section titled “Can I test Cloudflare Turnstile on localhost?”Yes, two ways. Cloudflare’s dummy keys (sitekey 1x00000000000000000000AA with secret key 1x0000000000000000000000000000000AA) always pass and work on any domain, including localhost. To test with your real keys, add localhost or your local IP to the widget’s hostnames in the Cloudflare dashboard.
How long is a Turnstile token valid?
Section titled “How long is a Turnstile token valid?”A Turnstile token is valid for 300 seconds (5 minutes) and can only be used once. Reset the widget after every submission attempt so the next submission gets a fresh token; a submission carrying a spent or expired token is marked as spam.
Related Documentation
Section titled “Related Documentation”- reCAPTCHA Integration: Alternative CAPTCHA provider
- hCaptcha Integration: Alternative CAPTCHA provider
- Honeypot Protection: Additional spam protection
- Authorized Domains: Restrict which domains can submit
- HTML Integration: Static site setup guide
- React Integration: React setup guide
- Next.js Integration: Next.js setup guide
- Nuxt.js Integration: Nuxt.js setup guide
Was this page helpful?
Thanks for your feedback.